Today in this article I have come up with a guide on How to Hard Reset Samsung Galaxy A41.
So Hello, how are you? I hope you are having an amazing day.
The steps to hard reset are very simple and straightforward you just have to follow the complete guide.
In this guide, I have shown you two methods in order to successfully Hard Reset Samsung Galaxy A41. The reason behind sharing two methods is, if one method fails then you have the second option.
What Is Reset?
Reset is an option to erase all stored data on your Galaxy A41, such as your installed apps, photos, videos, music and brings your phone new conditions like when you first time booted your phone.
You can restore all the data from your Google account later. and this option makes all the settings of your phone the same as the default settings, as well as the entire data of your phone is deleted, which makes your phone completely clean.
Benefits of Resetting Samsung Galaxy A41
By resetting your Samsung Galaxy A41, all junk files are deleted from your phone, and your Galaxy A41 is fully cleaned, so it does not even hang and work well.
Also, nowadays a lot of pop up ads are coming in the phone due to some virus. If you reset your phone, then you can get rid of unnecessary popup ads.
Using this method, your Galaxy A41 will be completely clean and like new condition, as well as after using this method all your settings will be back to default.
Disadvantages of Resetting Samsung Galaxy A41
If you reset your Galaxy A41, you will lose all your data (contacts, images, videos, installed applications). So before resetting your phone, you must keep the backup of your phone so that you can recover all your data later.
Pre-Requirement:
- The reset process requires a minimum of 50% battery, so fully charge your Samsung A41, if your phone battery is low and you will perform the reset process then you may get stuck in the middle of this reset process.
- Make sure to Take Complete Backup of your Android Phone.

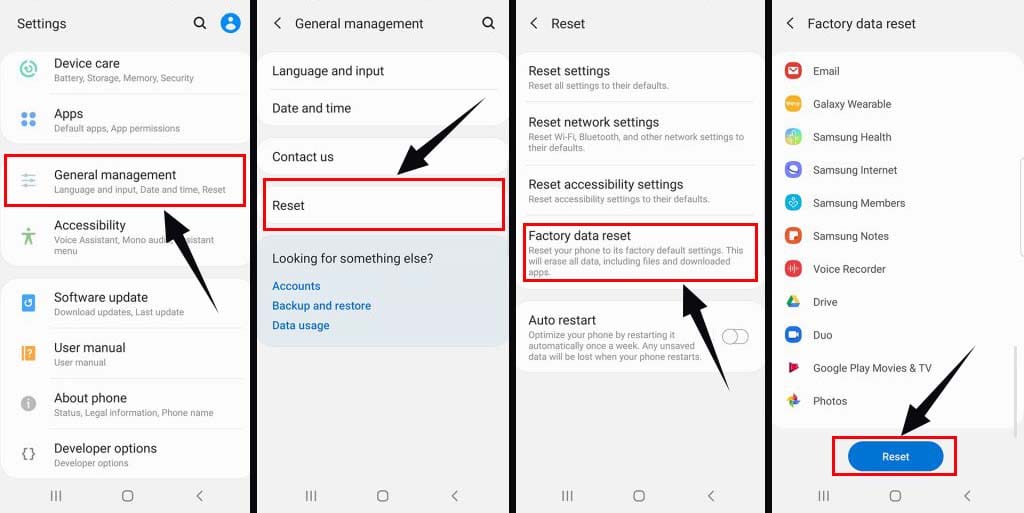
Method 1: Factory Reset Samsung Galaxy A41 Using Settings Menu
The easiest way to reset the Samsung Galaxy A41 is through the Settings menu. If you can access the phone content, you can perform a factory reset process using your device factory data reset menu.
To perform this process you will need to follow all the steps below so that you can easily store your phone Reset through the Settings menu.

- First, open the Settings Menu
- Then tap on General Management menu
- After selecting the appropriate options in the menu, tap Reset
- Now click on Factory Data Reset
- You will get a Reset Option again, you have to click on it, after that your screen lock will have to be verified
- Then click on Delete All
- That’s it 🙂
- Your Galaxy A41 has been successfully factory reset.
After the factory reset process is complete, your Galaxy A41 will automatically restart and the first opening may be slightly longer than normal. When you come to the setup screen, you can log in to the Google account and skip the setup process.
Must See: Factory Reset Samsung Galaxy S20 Plus?
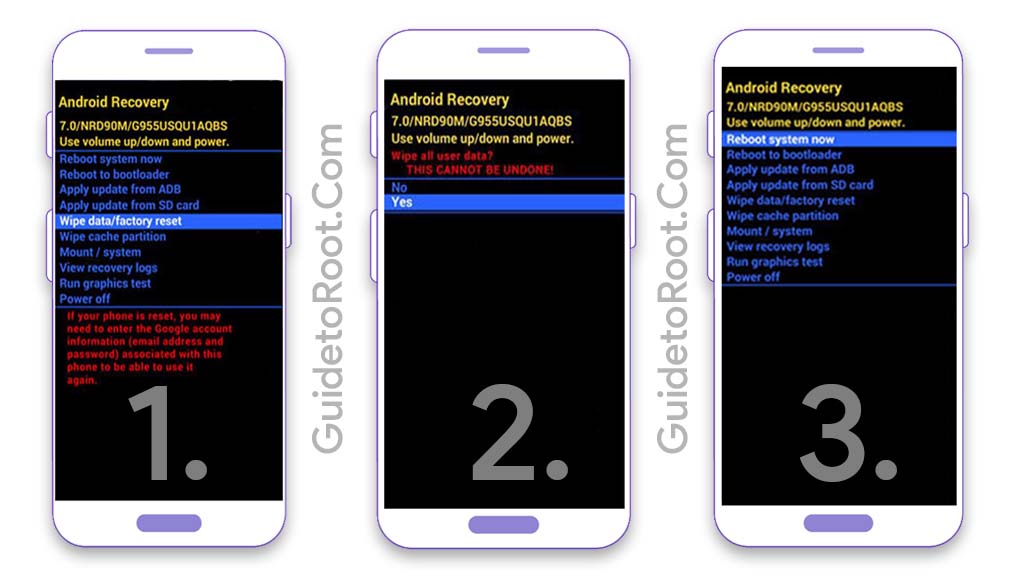
Method 2: Hard Reset Samsung Galaxy A41 Using Recovery Mode
The second way to reset the Samsung Galaxy A41 is through recovery mode. If you cannot access your phone contents and if you have forgotten pattern lock or screen lock, then you can reset your Galaxy A41 from the physical button and unlock your phone through recovery mode.
To do this process you have to follow all the steps given below so that you can easily reset your Samsung A41 through the recovery mode.
- First turn off the Galaxy A41, to do this, hold down the volume and power key.
- Then when the phone vibrates, press the Volume Up + Power button simultaneously for a few moments.
- Release all buttons when the recovery mode screen appears.

- Go to the Wipe Data/Factory Reset option via the Volume Down button and click the Power Button to confirm it.
- Now choose the factory data reset option from the menu and click on the power button.
- Then process is over, Go to Reboot System Now and confirm the press by the Power Button.
- That’s It 🙂
Must Read: How to Hard Reset Samsung M21?
Method 3: Reset Samsung Galaxy A41 using Google Find My Device
- First of all visit the Google Find My Device official website.
- Then Sign in with your Google account.
- Now you will get some options like Play Sound, Secure device & Erase device.
- You have to click on Erase device from those options.
- Then finally, Tap on the Erase Device option.
- That’s It 🙂
If you are looking for a guide on how to Hard Reset Samsung Galaxy S20 Ultra 5G, then make sure to check out that article as well.
After the factory reset process is complete, your Samsung Galaxy A41 will automatically restart and the first opening may be slightly longer than normal.
When you come to the setup screen, you can log in to the Google account and skip the setup process.
Two Easy Ways to Unlock Samsung Galaxy A41
In case you forgot the password or pattern lock of your Samsung Galaxy A41?
So you can follow some of the methods mentioned below:
I have given two methods to unlock Samsung Galaxy A41, it depends on you which method you choose.
Method 1: Unlock Samsung Galaxy A41 with Answering Security Questions
This method can help you if you want to reset your passwords without losing your data, and it will be possible if you have set up a security question under the Google account security.
- After several unsuccessful attempts, you will get the option of Forgot Pattern and Forgot PIN/Password on your phone, Click on it.
- Then tap on the ”Answer Questions” option.
- Now, enter the answers to the security questions according to you.
- If the answer you entered is correct, then your Samsung Galaxy A41 will be unlocked.
- Next, You will then be asked YES or NO whether you want to create a new PIN, password or pattern lock password for your Samsung Galaxy A41.
- Select Yes option to create a new password or pattern lock for your device.
- That’s It 🙂
Must See: How to Unlock Samsung Galaxy Xcover 6 Pro?
Method 2: Unlock Samsung Galaxy A41 using your Google account
- After several unsuccessful attempts, you will get the option of Forgot Pattern and Forgot PIN/Password on your Galaxy A41.
- Now, login to your Google Account by entering the details like your Username/Password.
- Next, click on the Sign-in button.
- That’s It 🙂 Your Samsung A41 will be unlocked.
Are you facing some Common problems in Samsung Galaxy A41? here you can find a solution to your problem.
Wrapping Up:
So, I have shown you the complete guide on How to Hard Reset Samsung Galaxy A41.
I hope you find this article useful and you are able to Reset your phone.
If you have any doubts or questions related to this guide then make sure to drop a comment and I will try to resolve your issue as soon as possible.


